Pages

Wednesday, February 24, 2010

Van Gogh Auction Project

Even Van Gogh himself would be proud of this copy of his "Café Terrace" painting, created by our 2nd graders to raise money at our annual school auction.

Each year, our school holds a fundraiser auction to raise money for special programs. While many valuable items are donated to be auctioned off, the items that create the most excitement are usually our special "class projects". These are art projects created as a joint effort by each class, with each student contributing a part of the finished piece.

This year our 2nd graders made a copy of Vincent Van Gogh's "The Café Terrace on the Place du Forum, Arles, at Night" and as you can see, it is magnificent! Here's how you can make one, too:

1. First, divide a fine art poster (you can find these inexpensively at art.com) into the same number of equal-sized sections as you have students. (If the numbers don't work out exactly right, consider having the teacher, principal or other school "celebrities" create a section, too.) Carefully cut the poster into separate pieces. (It can "feel wrong" to cut up a perfectly good art poster, but the end result is worth it!)

2. Next, number the pieces on the back and draw an arrow pointing to the "top".

3. Now, cut heavy weight black paper to the same size and distribute one piece to each student, along with their piece of the poster. Copy the number and arrow from the back of each poster piece to the back of the black paper.

3. Then, have students use oil pastels to re-create their section of the poster onto the black paper. For best results, remind them to focus on just copying the shapes, colors and placement of what they see on their poster section and to try not to think so much about what those shapes and colors represent. Encourage them to mix and their layer colors for a richer, more interesting effect and to cover the entire paper with oil pastel.... don't leave any black paper showing!

4. Finally, reassemble the finished pieces and use "YES!" Paste to glue them down onto a piece of black mat board, leaving about a 1/4" space between the pieces. (Frame your creation with spacers along the edge between the mat board and the glass.)

Helpful tip: You can save a lot of money by using a ready-made frame for your creation, rather than having it custom-framed. To do this, it helps to find your frame first, then work backwards to choose the size of your art poster, allowing for the 1/4" space you will leave between the pieces. Posters can also be enlarged into murals using this technique, but that project is better for 4th grade and up, as changing sizes can be very confusing for younger kids.

Our very talented 2nd graders, proudly displaying their finished masterpiece!
(It happened to be "Crazy Hair Day" when we took this picture!)

Wednesday, February 17, 2010

Happy 100th Day of School!

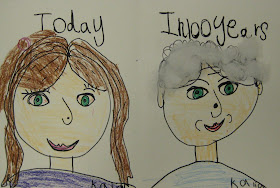
Last week our adorable Kinders celebrated the "100th Day of School". One of their many fun activities was to draw self-portraits of themselves today and in 100 years! As you can see, the results were charming!! Even if your 100th Day of School has already passed, this is a fun project to do anytime!

1. Fold a piece of 12"x18" white construction paper in half.
2. On the left half of your paper, write "Today" at the top and draw a self-portrait of how you look today. Use a black "F" Sharpie and just go for it! (They watch me demonstrate first, as I remind them of the basic proportions of the human face.)
3. Then, on the right half of your paper, write "In 100 Years" at the top.
4. Next, talk about the characteristics of a person who is really old. (The kids always look like they are really checking me out when I ask them about this.... hmmmm, I'm not sure how I feel about that!) Some responses might include shorter gray or white hair (or no hair!), wrinkles ("smile lines"!), eye glasses, smaller with not as much of a neck (due to being hunched over a little).... you get the idea!
5. Now draw how you think you might look in 100 years!
6. Finally, color your drawing with crayons, being careful to color all one direction (the "Kindergarten way") and fill in areas completely.
7. Pull apart some cotton balls and glue on for hair.
8. Don't forget to sign your masterpiece, since this one will be a definite "keeper"!

Friday, February 12, 2010

Hand-Made Envelopes

Kids love to make hand-made greeting cards for holidays, but most of these cards don't fit into conventional envelopes. Here is an easy way to make your own envelopes, and even add a liner to make them extra-special!

To Make an Envelope:

1. Lay your card diagonally on a square of paper that is a little larger than your card on each side. (If you make your card from an 8 1/2” x 11” or 9” x 12” paper folded in half, then a 12” x 12” square will work perfectly for the envelope.)

2. Fold each side up over the card, beginning with one of the shorter sides and ending with one of the longer sides. If you lightly “score” your envelope (with your fingernail or a paper clip) along the edges of the card it will make it easier to fold.

3. Remove the card and unfold your envelope. Cut away the triangles where the fold lines cross. You can round all the corners with scissors if you want.

4. Now fold the bottom up and glue the sides to it.

5. To finish, put your card back inside and glue the top down or seal it closed with a sticker.


To Make a Liner for your Envelope:

1. Measure the width of your envelope, and subtract 1/4 inch. For the length, open up the flap of the envelope, and measure from the bottom edge to about ¾” below the point. Cut your lining paper to this size. (To line an envelope for a 6”x9” card, cut your liner paper to 8 ¾” x 10 ¼”.)

2. Next, slide the lining paper into the envelope, and fold the corners down about ¾” below the edge of your flap, to allow room for gluing. Crease well. Remove the lining paper and cut along the fold lines.

3. Insert the liner into your envelope, and fold it down along the flap fold. Place a piece of scrap paper between the liner flap and the body of the envelope to protect the envelope from glue. Finally, glue the back of the liner to the inside of the envelope flap.

4. Fold the envelope flap over the liner, and rub well. Lift flap and remove the scrap paper.

Wednesday, February 10, 2010

Gung Hey Fat Choy!

Chinese New Year falls on Valentine's Day this year! Chinese New Year is often celebrated with a parade led by a long, colorful dragon. My 1st graders drew a fun Chinese Dragon to ring in the "Year of the Tiger"!

1. Cut a piece of 12"x18" white construction paper in half to measure 6"x18".
2. Using pencil, draw a long curvy "snake-shape" across the middle of your paper. Leave room at the head-end for plenty of fire breathing!
3. Add front and back legs, with sharp claws.
4. Add wings, if you want.
5. Now put your pencil away and trace your lines with a black "F" Sharpie. Use only Sharpie for the rest of your details.
6. Draw a line across the middle of the body, dividing it in half. Add scales on the upper half and a different pattern on the lower half.
7. Add spikes across your dragon's back, sharp fangs and fire coming out of its mouth.
8. Write the words, "Gung Hey Fat Choy" ("Happy Chinese New Year") at the top.
9. Color your dragon with crayons or markers.

Tuesday, February 9, 2010

Valentine Color Mixing

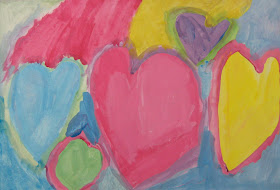
You can mix a "tint" of any color just by adding white to it. Painting with tints lends itself well to Valentine projects, like this colorful card made from a 12"x18" painting folded in half.

1. First, place a "quarter-size" amount of red, yellow and turquoise tempera paint on a paper plate. (I like to use "turquoise" rather than "blue", because it's closer to "cyan", or "true blue".)
2. Next, add some white to each of your colors to mix tints of those colors.
3.
Now mix separate puddles of tints of orange, green and purple using your new tinted primary colors. Add more white to achieve varying degrees of tint.
4. Then paint hearts in varying sizes across your paper.
5. Now, use another color to paint an outline around each of your hearts.
6. Finally, fill in all the "in-between" spaces with more color. Remember to use only tints in your painting!

Sunday, February 7, 2010

Cut Paper Symmetry “Pop-Out” Card

This is a fun card to make for any occasion... just vary the colors you use and the shapes you cut to suit the holiday or theme! The pop-out feature inside (see below) is an added bonus!

Front of Card:
  • 9” x 12” construction paper (this will form the “base” of your card)
  • 3” x 9” paper in a contrasting color
  • scissors and glue
  1. Fold the 9” x 12” paper in half horizontally, to form the base of your card.
  2. Fold the 3” x 9” paper in half vertically, then open it up and fold it in half horizontally. Open again. This will aid you in creating a symmetrical design.
  3. Cut shapes from the 3” x 9” paper along each edge as well as in the middle of the paper, folding in half where helpful to make the cuts. This step can be kept very simple for young children or made more complex for older ones.
  4. Glue the section you cut the pieces from onto the right side of the front your card, aligning the edges.
  5. Now lay the cut-outs back into their original places and draw a small “x” in pencil on each one (so you’ll know which side to put the glue on).
  6. Place a small amount of glue onto the “x” side of each of the cut-out pieces, then flip each one over and place it onto the left side of the card in reverse symmetry.
Inside of Card:

  • 9”x12” construction paper, in a contrasting color to the base of your card
  • scissors and glue
  1. Fold your paper in half horizontally.
  2. With your paper still folded, fold it again about 2” from the fold.
  3. Unfold the second fold and cut simple shapes into the first folded edge, being careful not to cut beyond your second fold line. (You can mimic some of the shapes you cut on the front if you want to unify your design.)
  4. Now, push this first fold to the inside, so that you see an “M” or a “W” shape when you look at your paper from the edge.
  5. Glue the inside of your card to the base of the card, matching corners and leaving the center section folded into the middle.

Saturday, February 6, 2010

"Hide-a-Heart" Valentines

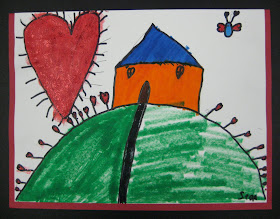
This lesson is adapted from Karen Card, my children's middle school Art teacher. You can do this versatile project with any grade level, scaling it up or down as needed. It's fun to give kids a little structure and a lot of freedom to be creative.... then watch as all the great ideas start flowing out!

1. Talk about how the elements in a design can be obvious or more subtle. Explain that we're going for in this project is "subtle"!
2. Brainstorm the many things you could draw using a heart hidden somewhere within them, drawing examples on the board as you go. Some possibilities include: flowers with heart-shaped petals and leaves, a butterfly with heart-shaped antennae or wings, a puppy with a heart-shaped nose and ears, heart-shaped clouds or a heart-shaped sun setting behind a hill, a tree with heart-shaped leaves, a fish with heart-shaped lips blowing heart-shaped bubbles.... you get the idea!
3. Draw a scene using as many "hidden hearts" as you can. You may draw with pencil and trace your lines with a black Sharpie or just go for it and draw directly with Sharpie.
4. Then color with markers.
5. Finally, use red "glitter glue" to paint over only the hearts in your picture. So charming!!

These "hide-a-heart" cards were made by my very imaginative 1st graders! We lined our cards with red paper (just a little larger than the white paper) to create a contrasting border around the art.


Wednesday, February 3, 2010

"Box Fold" Pop-Up Cards


The variations are endless for creating cards with a fun pop-up feature! You can easily change the “heart” element in this design to make cards for any holiday or special occasion. Try putting several pages together to make your own pop-up book!

To Make a Box Fold Pop-Up:
  1. Begin with two sheets of 9” x 12” construction paper, one for the inside of your card and one for the outside. (optional: You may want to use contrasting colors and trim the inside paper to 8 ½” x 11 ½”, so that the contrast shows when you open the card.)
  2. Fold each paper in half so that its short ends meet.
  3. Determine how many pop-ups you want inside your card. Then, on the fold of your inside paper, cut a pair of parallel lines about an inch apart for each pop-up. The shorter your cuts, the closer your pop-up will be to the back of the card. The longer your cuts, the further it will pop out. If you have more than one pop-out, you can vary the distances they pop, for a more 3D effect.
  4. Fold over the flap between each pair of parallel cuts, then fold the flap the other way to crease it in the other direction.
  5. Now open the paper a little and push the flaps into the center of your card with your finger. Then close your card and smooth it flat. When you open the card, your box folds will appear!
  6. Next, put some glue on the back of your inside paper, being careful to avoid the box fold. Line up your folds and press the inside paper into the fold of the outside paper. Press flat to dry.
  7. Finally, use construction paper or card stock to cut out your pop-out images and glue onto the front of the box folds. (Important! Make sure your pop-out figure is not taller than the distance between the top of your box fold and the top of your card, otherwise it will stick out when you close the card!)
These cards are fun and easy to make! Just follow the directions step by step, then experiment with your own variations and get creative!!